30 septembre 2008

Transmitter prototype


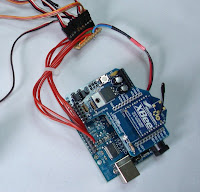
The transmitter is an old Graupner D14 box, with its sticks. All the original electronic has been removed. The prototype has 4 channels, but more could be added, up to 6 or 8. The case is even too big for this electronic.
It has very simple programmation, as there is no possibility to change any setting in the transmitter, except by reprogramming the Arduino :) More possibility can be added later, but for now let's "keep it simple".

The Arduino boards and the Xbee shields fit tightly on the top of the case.


It is powered with 5 cells to get above 5V, as required by the Arduino. Transmission speed to the receiver is 38400 bds, which make the servo moves reasonably smoothly.

Next step is to finish up the prototype of the receiver, and do some more tuning in the software.

16 septembre 2008

My first home made RC receiver


This is my very first home made RC receiver. It works on 2.4Ghz band, and can control up to 6 servos. It receives datas from the transmitter for servo position, but can also transmit back informations. As it is home made, it requires a special transmitter to work with. It keeps servo positions even if there is no transmitter. Later on fail safe will be added.

It is made with ready to use boards boards that you just need to fit together. There is no need to make PCB and solder components, just some soldering to adapt connections for the servos.
This is not yet a small receiver, but it can fit large models. It's about the size of the good old receiver that were made many years ago :). The next versions of the receiver will be smaller.

Here is small video showing servos moving around.

14 septembre 2008

Servos controlled remotely from a PC


Today, I have been able to control remotely servos from a PC through a pair of XBee modules.
On the receiver part I used an Arduino Dicemilla + XBee module and Futaba servos. This makes quite a big receiver to put in an RC modele, eheh, but hopefully the size should be smaller later on.

On the sender side, I used an Xbee Pro connected to the PC through the USB/serial cable. The PC sends commands such as "10400". The first number is the servo number, and the 4 other digits provide the servo position in hexadecimal.

The communication between the two Xbees is bidirectional, and allows many fancies that can't be done with traditional radios. For instance, during the test, I could get back information telling if the command has been successfully passed or not.

The nice thing about this, it that it all numeric: the sender sends pulse as number, the receiver receives pulse as number, and transform that to real pulse in time. Even if I stop the Xbee transmitter, the servo keep and hlod their current positions without any move. This makes easy to implement a failsave, where the servo go to a predefined position when no transmitter is detected.

The next step will be to couple the Sanguino with the Xbee to make the transmission part.

wee


ok, given than more and more people connecting to this blog are english spoken, I switch my blog to English. Sorry for french :), if there is something you want to ask, do not hesitate to ask your question in comments or by mail in French.
Yesterday I received my Wee from SParkfun. It's the same thing than an Arduino except that it is much smaller, has one or two analog entry less, and runs at 8Mhz. The Wee also runs at 3.3v, so that make easy to adapt it to an Xbee which is also 3.3v.
The benefit of the wee is that it's small, so coupled with an Xbee it could be used as a RC receiver.

11 septembre 2008

Commande des servos en parallele


Le soft pilote maintenant jusqu'a 8 servos, avec une precision assez bonne. Les servos ne grognent pas et se deplacent en continu d'un coté a l'autre selon mon petit programme de test. J'ai utilisé les interruptions avec un algo a ma sauce pour respecter au mieux les timings. Cela fonctionne bien pour l'instant, j'ai testé avec des servos futaba et un graupner. Le pilotage des servos se fait a partir de valeur numeriques, ce qui devrait permettre d'ajouter d'autres fonctions utiles comme le failsafe, ou le controle des gaz.

Le soft devrait pouvoir tourner sur un Tiny2313 ou similaire. Pour l'instant il fait 650 bytes donc il reste du gras.

A suivre: pilotage des servos a travers le XBee depuis un PC.

Oscilloscope


Pour "debugger" les problemes de timing pour le pilotage des servos, un oscilloscope est quand meme bien pratique. Seulement voila, ca coute cher ces bestioles pour un usage tres limité. Ou alors il faut avoir un copain pas loin qui en a un a vous preter, mais pas toujours facile d'avoir l'engin sous la main au bon moment.
La solution simple existe: utiliser le PC comme oscilloscope en entrant par la carte son. Rien de plus simple, il sufift de relier la prise micro de votre PC sur le signal a mesurer. C'est limité en frequence bien sur, mais ca permet de faire quand meme des mesures basiques.


Les softs: il en existe au moins deux sous Linux et une multitude sous windows. Sous linux, j'ai pu essayer xoscope. Il existe aussi osqoop qui est logiciel libre, mais ne marchait pas pour moi.
Xoscope m'a permis notamment de visualiser les trames et les interruptions.

04 septembre 2008

Xbee emetteur + Xbee recepteur


Les donnees sont envoyees par l'Arduino vers le XBee Pro a travers le port serie, puis le Xbee (Pro) envoie vers le second Xbee qui transmet alors vers le port serie du PC. Les connections series sont configurées a 9600 bps. Ca marche deja pas si mal!

03 septembre 2008

Potentiometre


Nouvel essai ce soir pour comprendre pourquoi les servos vibrent. En fait, le soft n'est pas le seul probleme. Il faut aussi une bonne alimentation des servos (evidemment) mais aussi un bon potentiometre. Le mien pas de tres bonne qualité oscille un peu et donc fait vibrer legerement le servo.
Le soft aussi: une simple boucle avec delay fonctionne bien, alors que l'utilisation de librairie servo fait vibrer le servo, et le neutre se promene un peu. A voir par la suite

02 septembre 2008

logiciels pour Arduino

Le plus simple pour programmer un Arduino est d'utiliser le soft Arduino. Il integre a la fois un editeur, un compilateur et le telechargement par le port usb/serie. Il y a du java quelque part, mais se base sur la toolchain gcc. Enfin c'est ce qu'ils disent dans la doc. L'avantage est qu'il existe pas mal de librairies qui simplifient beaucoup la tache, et permettre l'ecriture rapide de programme complexe.

Mais comme tout outil simple, il y a des inconvenient: relative lenteur de compilation, taille du code generée importante (environ 1k pour Blink), et moindre control du temps. De plus, si vous avez l'habitude d'un editeur type vi ou emacs, celui d'Arduino est tres primitif.

J'ai essayé de piloter 4 servos en utilisant les outils Arduino et la librairie de pilotage de Servos de playground. Resulat les servos "vibrent", sans doute a cause de l'envoi des trames par le microprocesseur qui n'est pas assez precis. Pour ameliorer la precision du temps, mieux vaut passer sur les outil gcc de base et avr-dude.

En utilisant les outils gcc-avr et l'excellent tutorial de avr freak, il devrait etre possible de gerer les trames envoyées au servo avec plus de precision.

J'ai suivi les instructions de cette page Program_Arduino_with_AVR-GCC pour installer, compiler et telecharger l'image dans l'Arduino. Ca marche parfaitement mis a part quelques parametres pour avr-dude qu'il faut regler, comme la vitesse de tranfert via le port usb/serie:

avrdude -p m168 -P /dev/ttyUSB0 -c stk500v1 -b 19200 -F -u -U flash:w:blink.hex


Le test du "blink" qui fait clignoter la led marche parfaitement, a condition de brancher la led au bon endroit. Attention car sous avr_gcc, les numero de port de sortie ne correspondent pas avec les numeros de Arduino et mieux vaut se referer directement a la datasheet de l'Atmel.